
If you're planning to use SMS, Voice AI, outbound AI dialing, or any text messaging features, you'll need to get "A2P approved."
SmartDirectoryAI can make the approval process much easier. You can temporarily disable all other opt-in paths across your directory, and then use the pre-built A2P widget as your primary registration form during the approval process.
What Is A2P?
A2P 10DLC registration is a process used by U.S. cellular carriers (e.g. Verizon, AT&T, T-Mobile, etc) to verify who is sending SMS (text messages) and what is being sent. A2P is short for "Application-to-Person," and 10DLC is short for 10-Digit Long Code.
A2P registration is a mandatory carrier requirement for businesses sending A2P SMS traffic in the United States. Registration is enforced by U.S. cellular carriers to verify sender legitimacy, consent integrity, and message transparency.
Carriers now review:
Your website
Your business information
Your opt-in process
Your privacy policy
Your terms of service
How users consent to receive messages
If your site contains multiple registration paths, unclear consent language, or inconsistent branding, approval can be delayed or rejected.
Overview of the Process
Getting A2P approved is a 2-step process:
Brand Approval - You will submit your business information to be reviewed. Your business name, website, address, phone, etc. as well as your personal contact information as the business representative.
Campaign Approval - You will submit the specifics of your messaging and business usage of SMS/MMS.
You will submit all of your information for both steps at once. But approval for each step is separate. You must first get Brand Approval, and then your Campaign Information will be reviewed and approved separately.
Before Applying for Approval
There are several elements you'll need to ensure are in place:
Registered Business
You should have:
A legally registered business
EIN or tax ID
Matching business information across your website and SmartDirectoryAI account
Consistent Business Name, Email, Phone, Address
Your:
Website Footer
Contact page
SmartDirectoryAI account
A2P registration
…should all use the exact same business information.
Inconsistencies are one of the most common causes of rejection.
Terms of Service & Privacy Policy Pages
Your site should include publicly accessible:
Privacy Policy
Terms of Service
These should clearly explain:
How customer information is used
SMS consent language
Opt-out instructions
Contact information
Phone Number Purchased
If you haven't purchased a phone number yet, you'll need to do that first. Here's a help article: Purchase phone number
Using the HighLevel A2P Registration Widget
HighLevel recently introduced a pre-built compliant registration widget specifically for A2P approval flows.
Official HighLevel documentation:
HighLevel A2P Campaign Widget Guide
This widget is designed to create a cleaner, more compliant opt-in experience that improves approval rates.
SmartDirectoryAI A2P Approval Settings
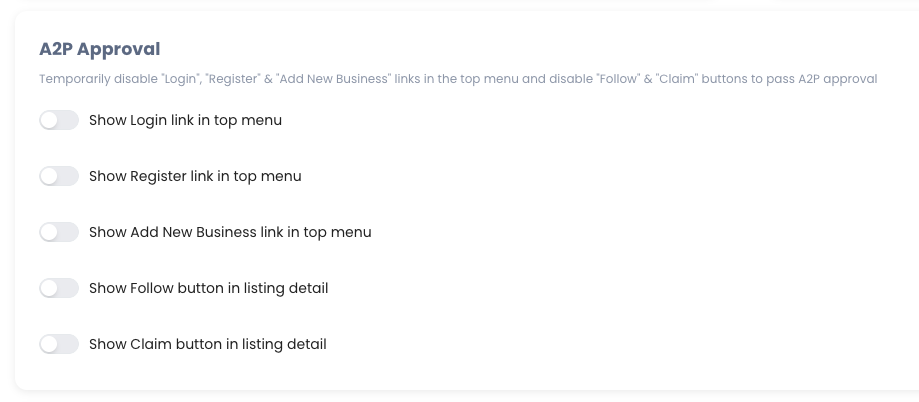
To support this process, SmartDirectoryAI now includes a dedicated A2P Approval section inside Settings.
These controls allow you to temporarily disable alternate opt-in paths throughout your directory while your A2P application is being reviewed.
You can disable:
Login link in top menu
Register link in top menu
Add New Business link
Follow buttons
Claim buttons
This helps ensure that visitors only register through the compliant HighLevel widget during the approval process.
Recommended Setup Process
We recommend the following workflow before submitting your A2P application:
Step 1: Make Sure You Have Prerequisites
Registered Business with EIN
Consistent Business Name, Email, Phone, Address
Terms of Service & Privacy Policy Pages
Phone Number Purchased
Step 2: Disable Alternate Registration Paths
Inside the SmartDirectoryAI A2P Approval settings (in your SmartDirectoryAI app, navigate to Branding > Content):
Turn OFF Login
Turn OFF Register
Turn OFF Add New Business
Turn OFF Follow buttons
Turn OFF Claim buttons
You'll also need to temporarily remove your Pricing page from your menu(s).
Finally, you'll need to temporarily disable the Site Reviews feature for all plans.

This ensures the only opt-in method on your site is the one we'll add soon.
Step 3: Begin A2P Registration
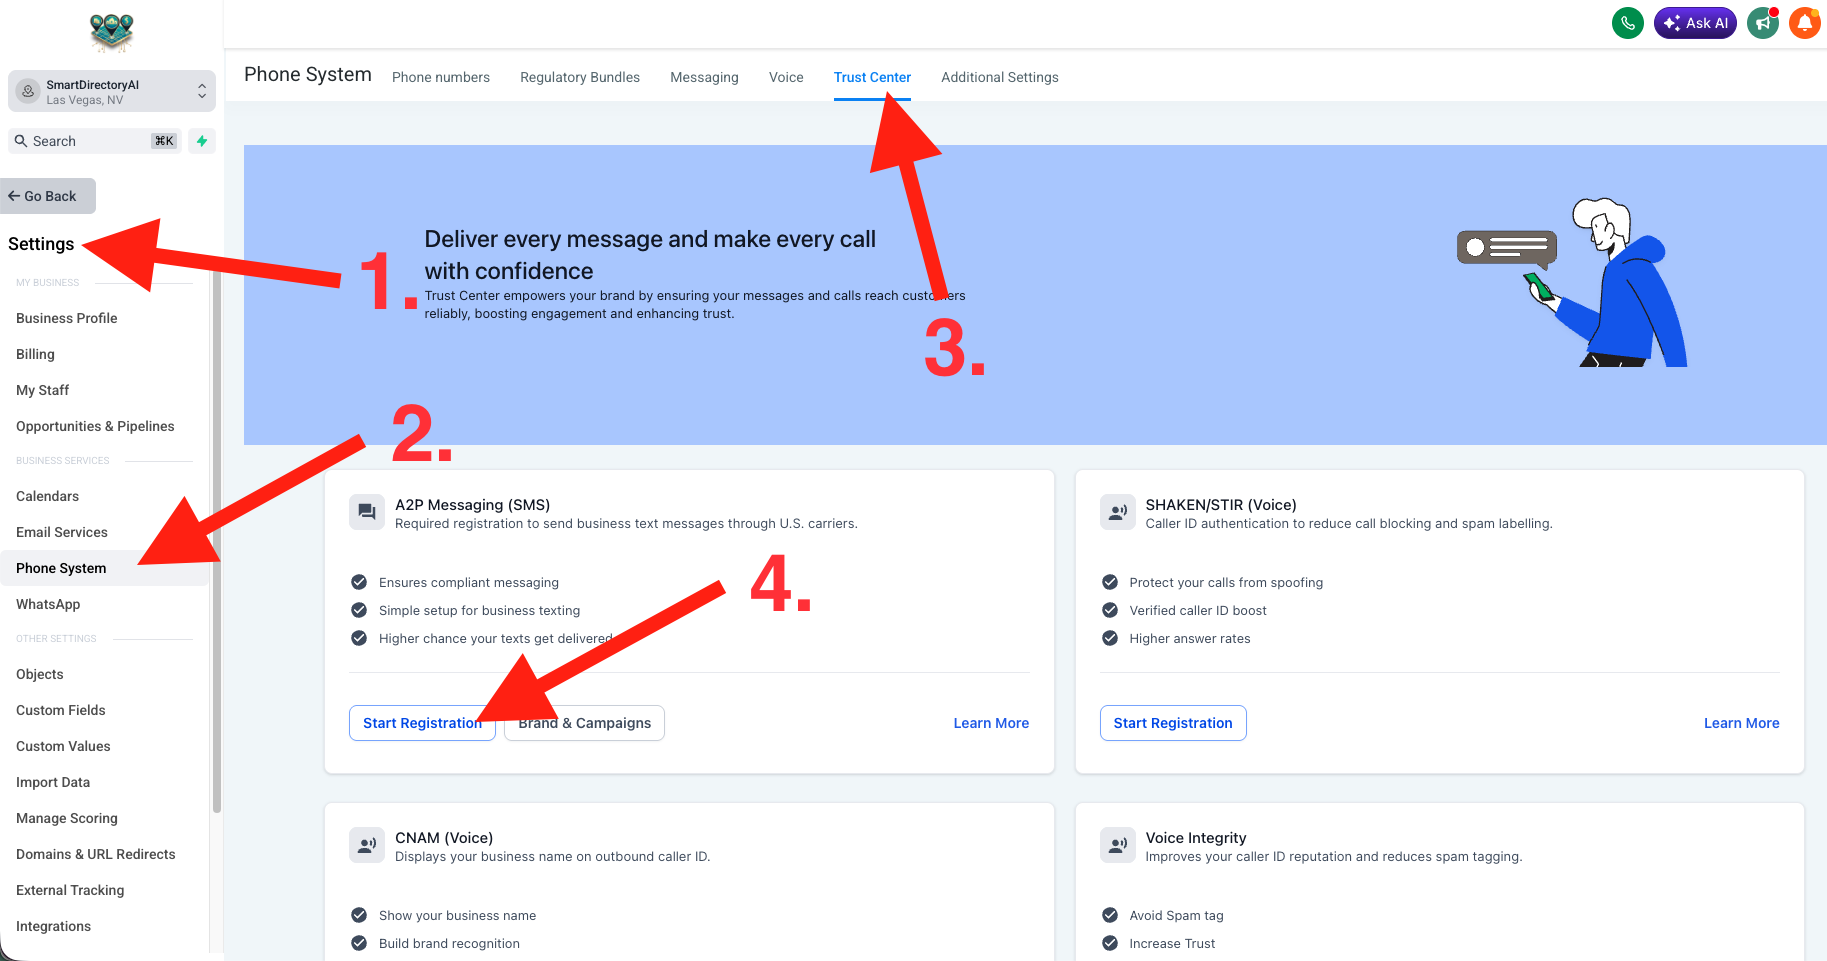
In the left-hand menu, very bottom, click Settings.
Select Phone System.
Select Trust Center.
Under A2P Messaging (SMS), click the Start Registration button.
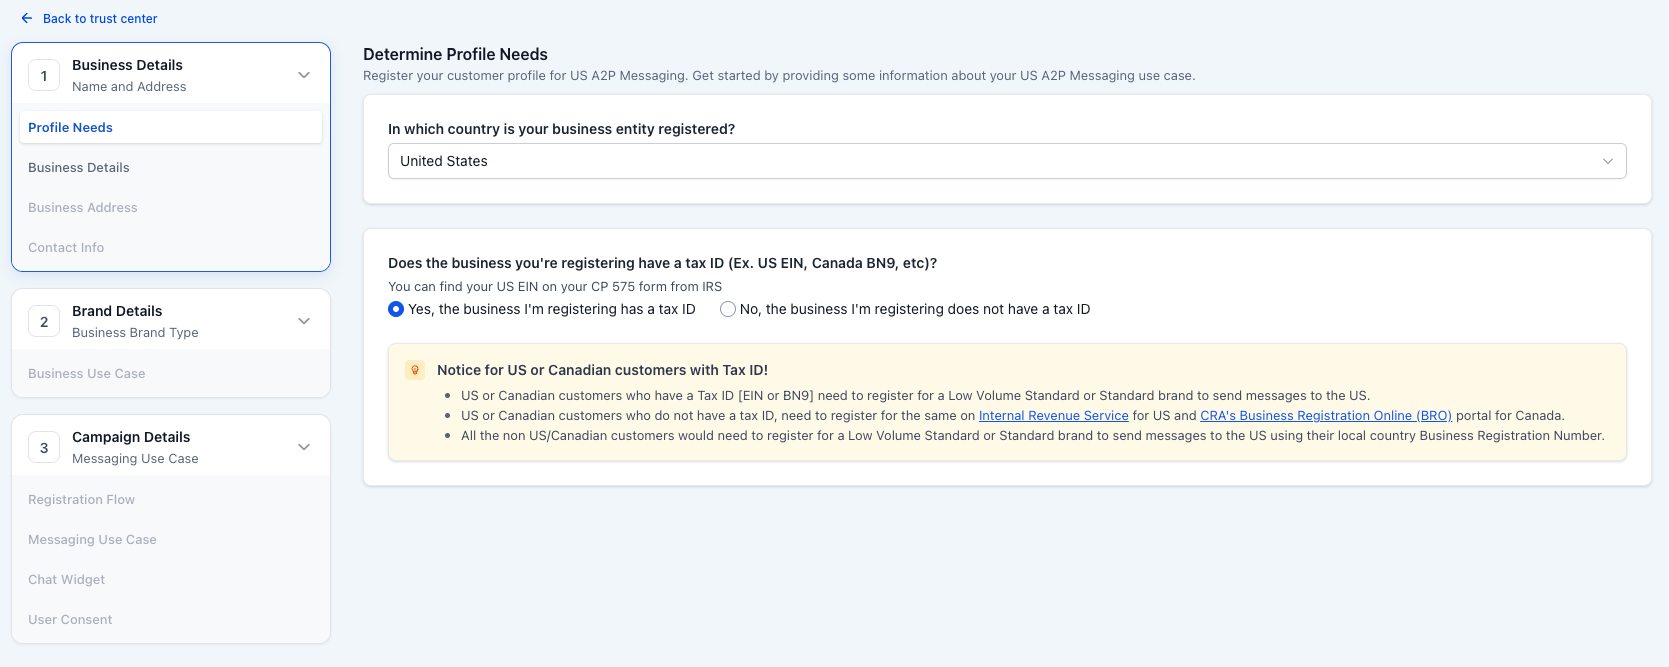
Complete the Business Details section.
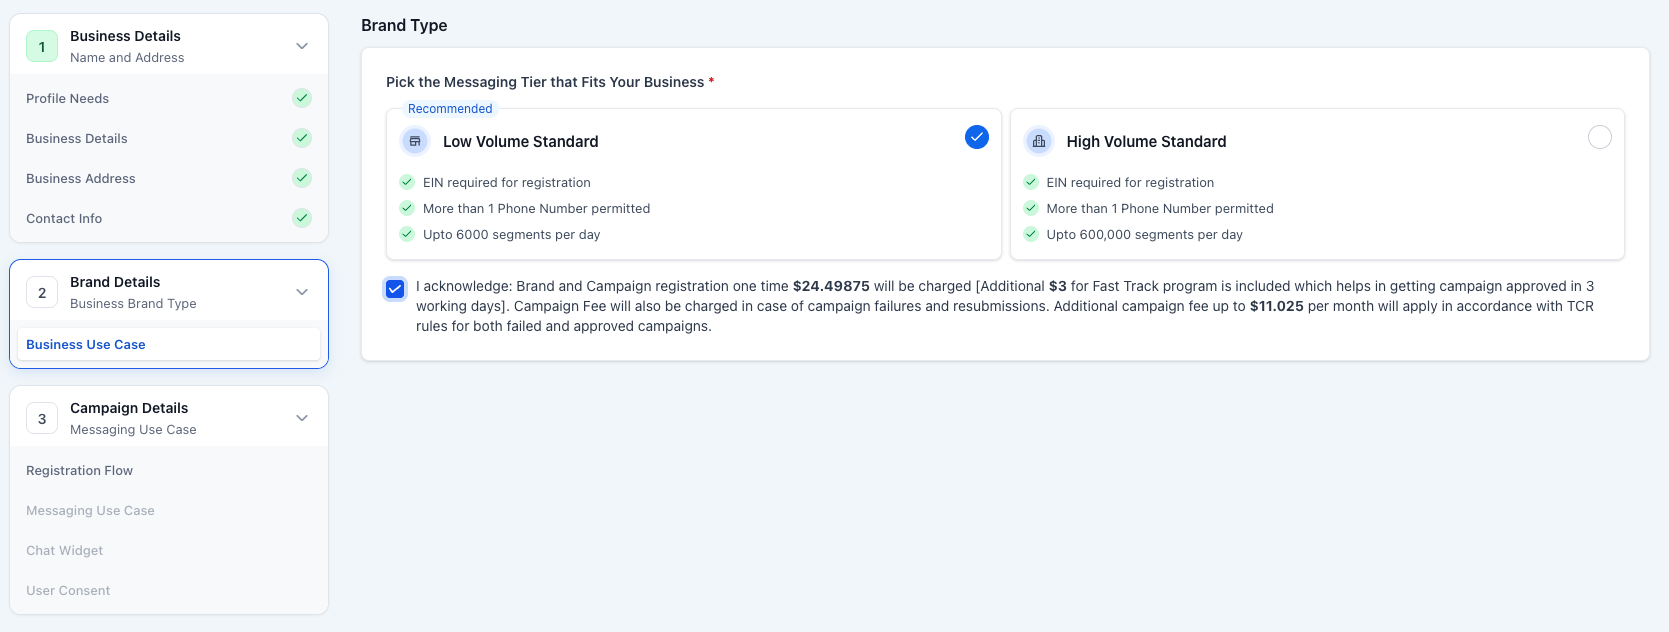
When you get to the Brand Details section, select Low Volume Standard and check the box to accept the registration fee. Click the blue Continue button.
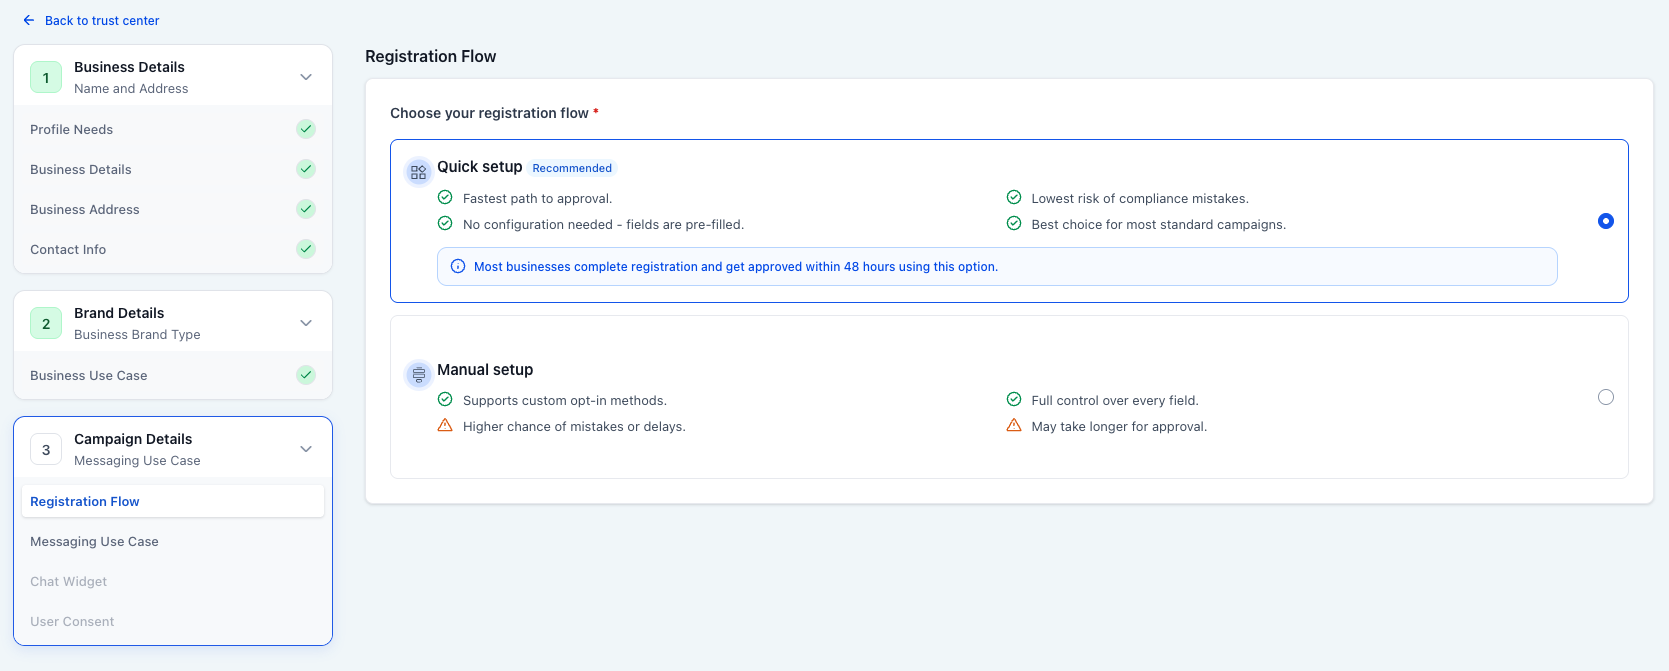
Step 4: Install the Pre-Built Widget
When you get to Campaign Details, select the Quick setup option. Click the blue Continue button.
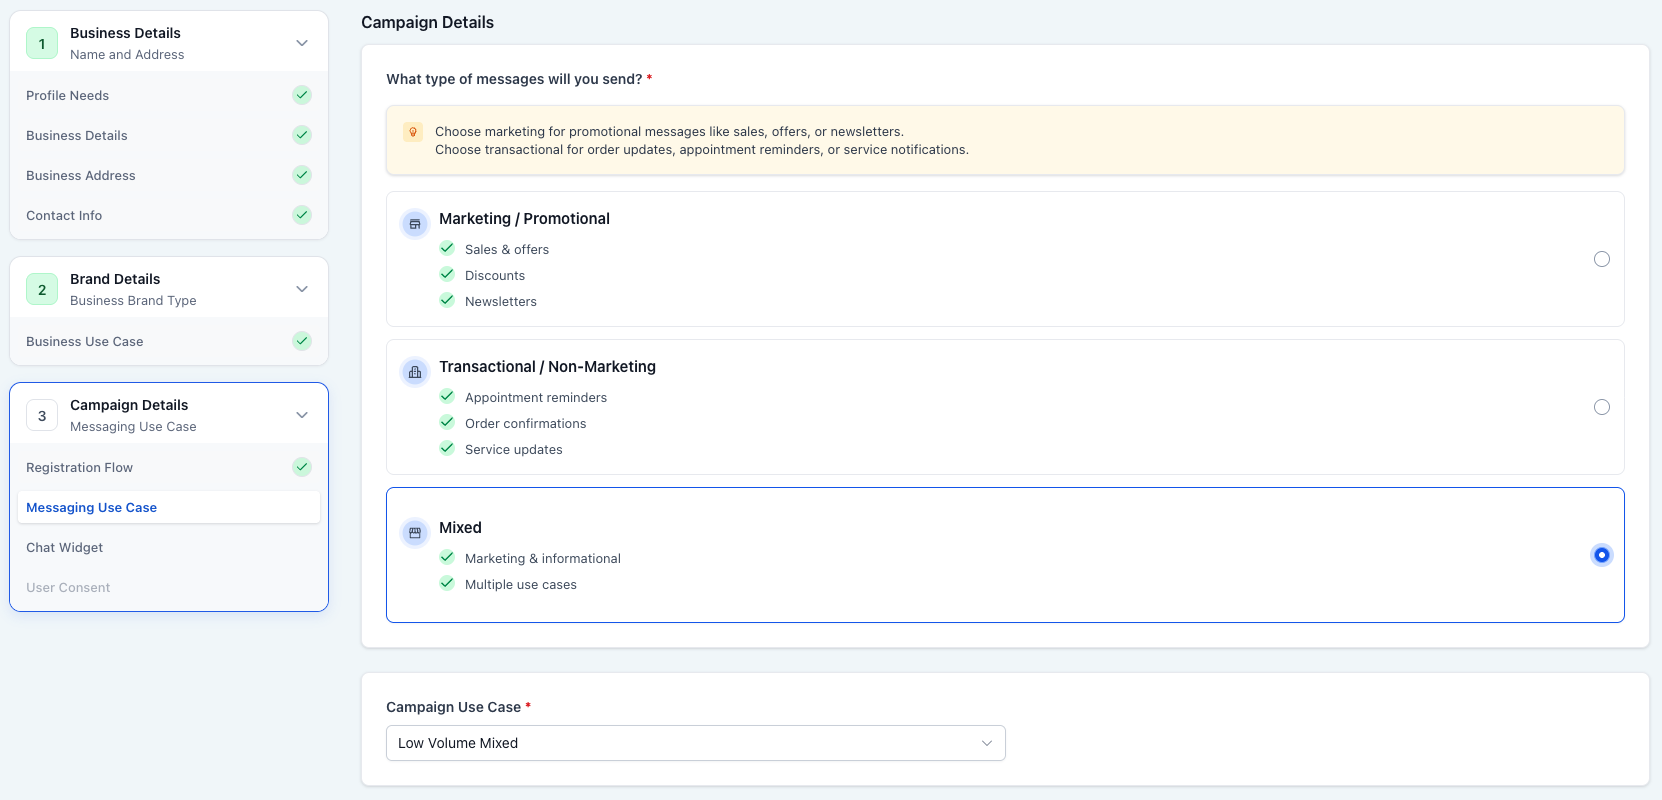
At the Messaging Use Case screen, we recommend selecting Mixed, and Campaign Use Case Low Volume Mixed. Click the blue Continue button.
Your pre-built widget has been generated. Click the blue Copy code button.
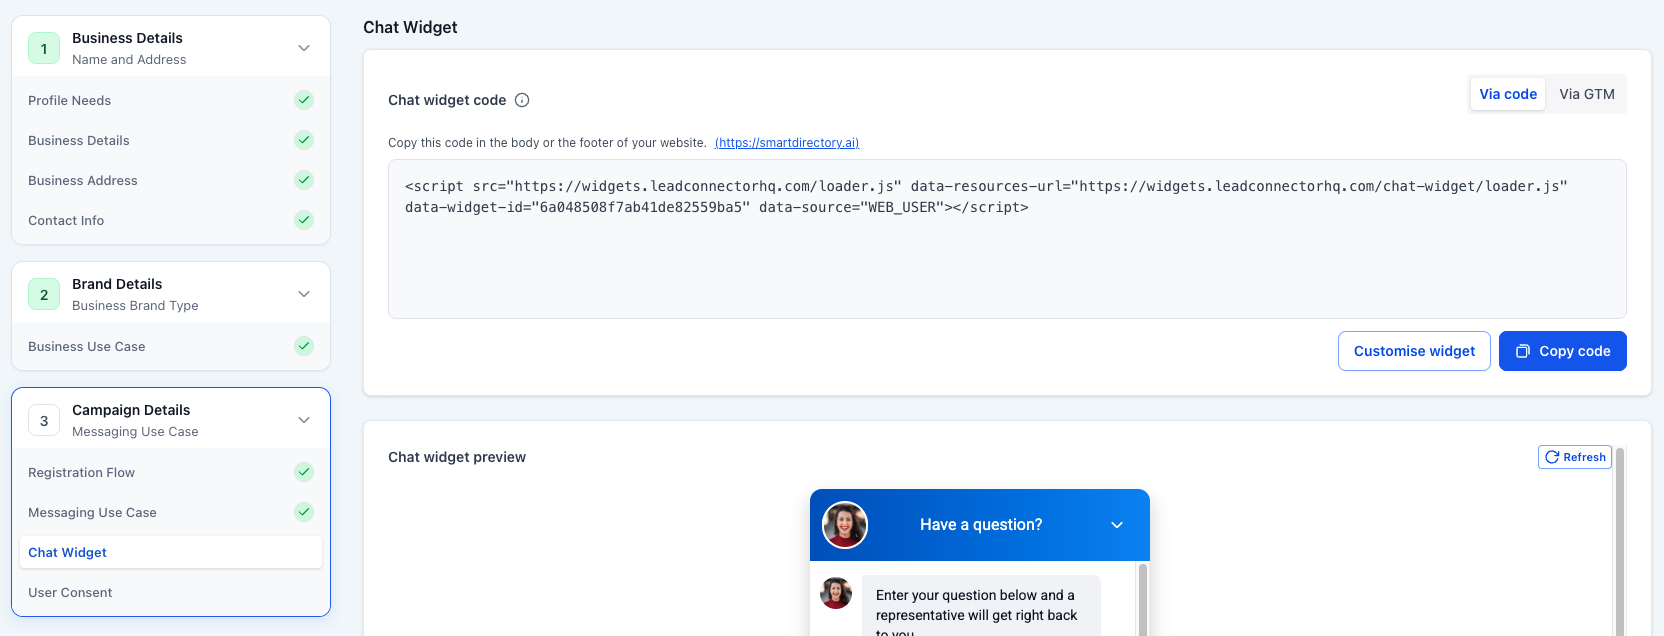
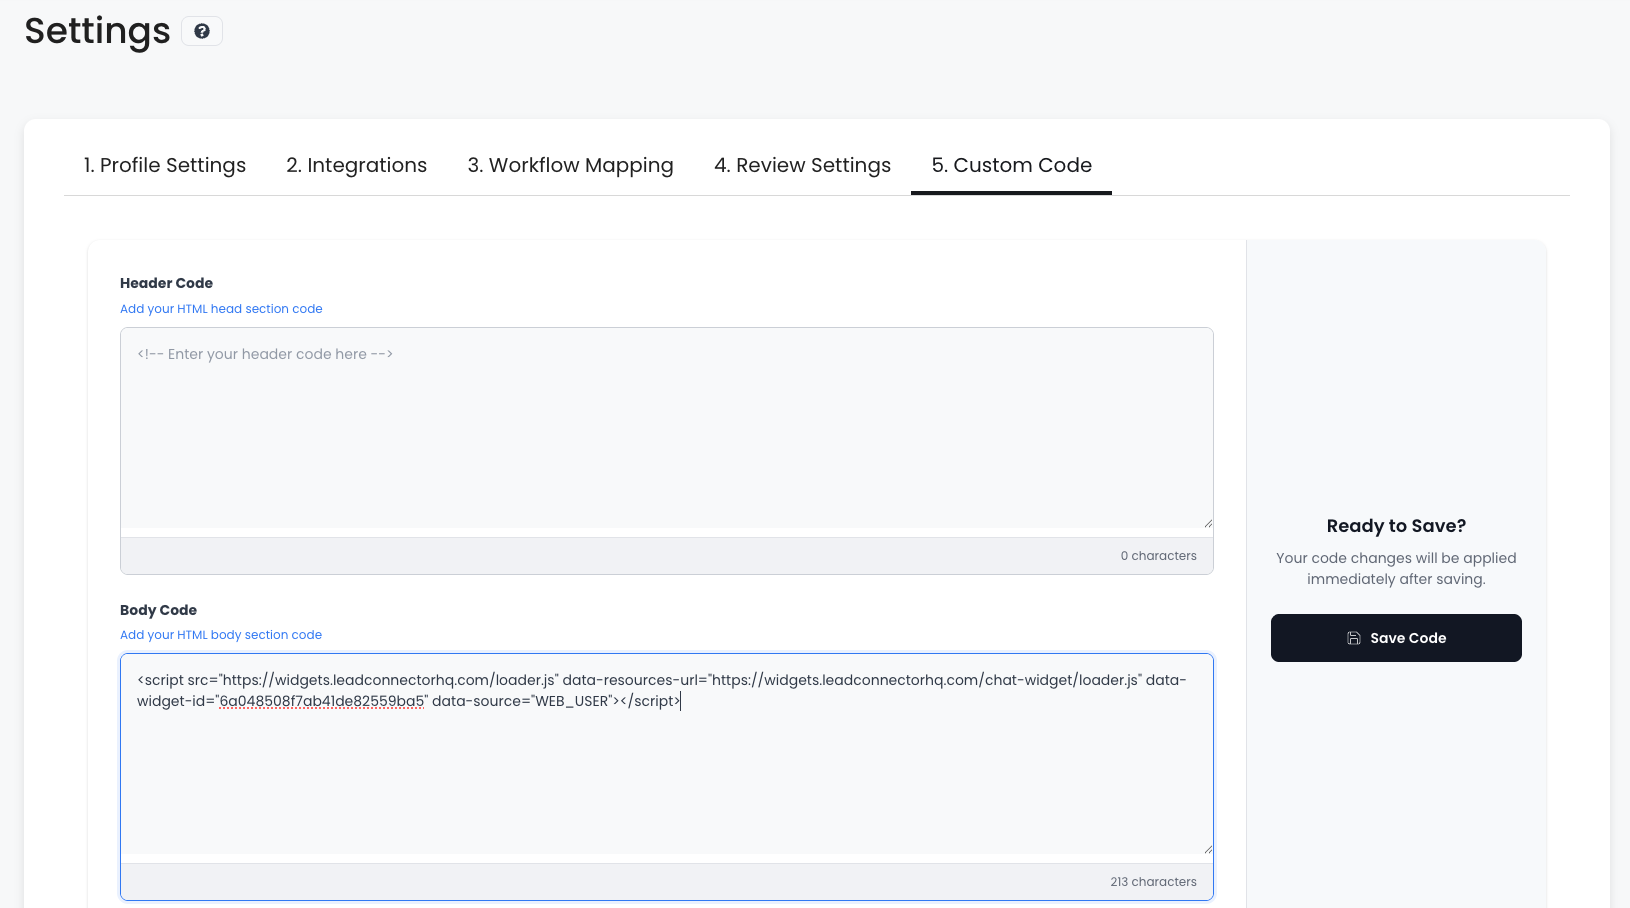
Open a new tab, and navigate to your SmartDirectoryAI dashboard. Then go to Settings > Custom Code.
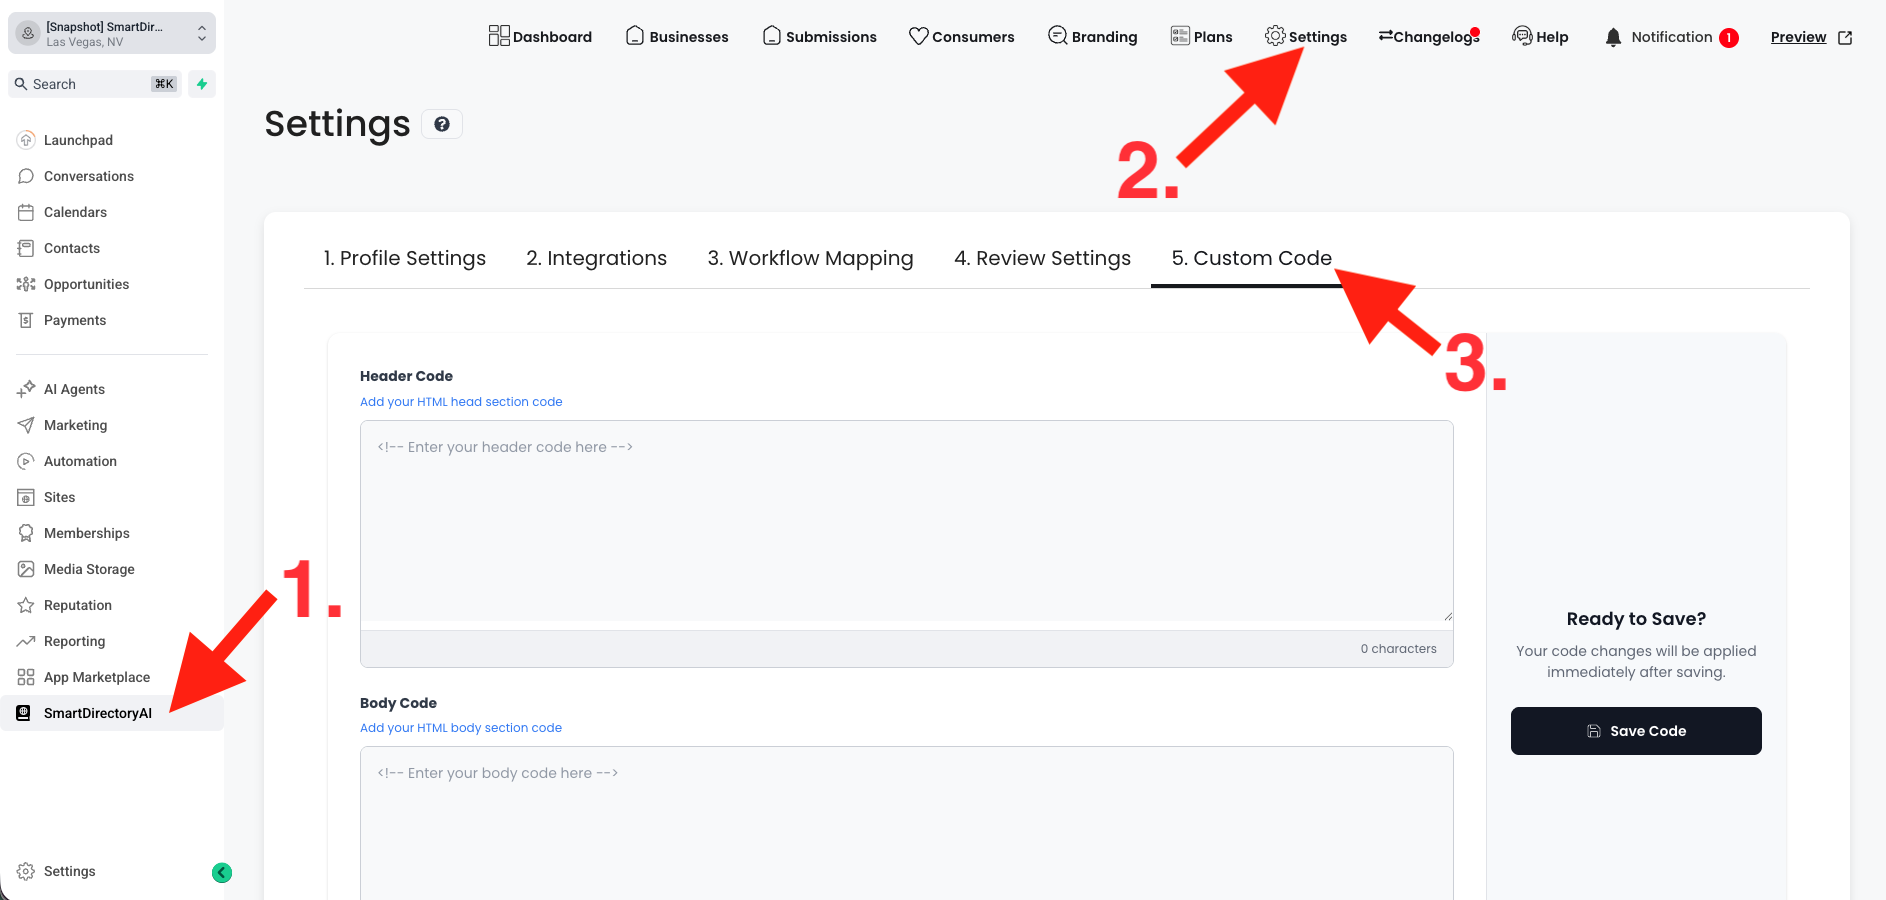
Paste the pre-built widget code into the Body Code section, and then click the black Save Code button.
Step 5: Finalize and Submit Your Registration
Head back to your original tab with the A2P registration. Click the button to continue to the next step.
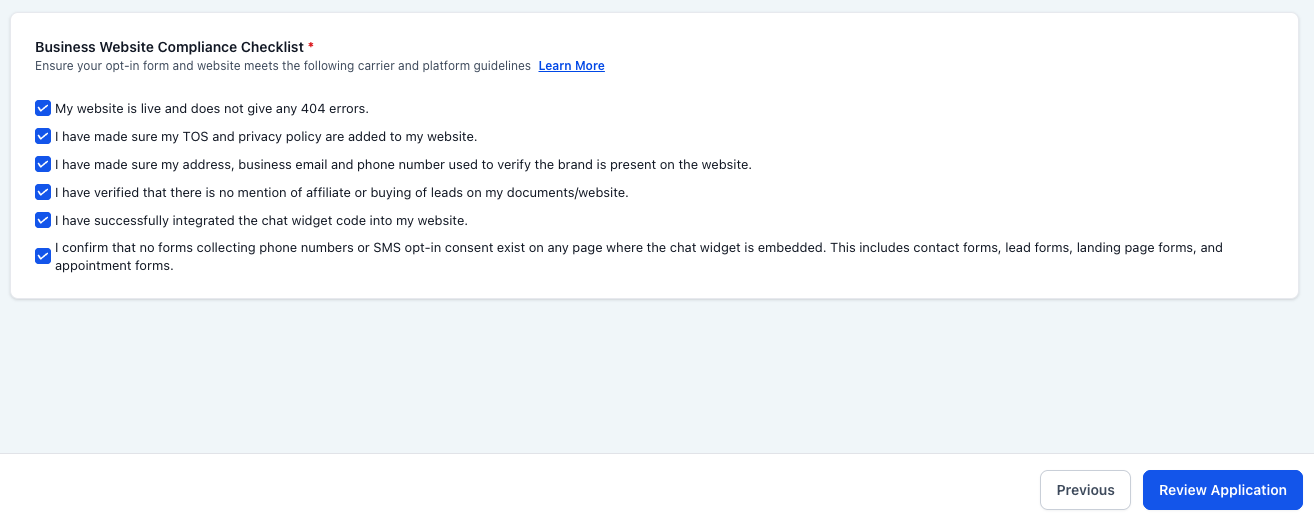
On the final page, review all the required items, and make sure you have each. Check each box, and then click the blue Review Application button.
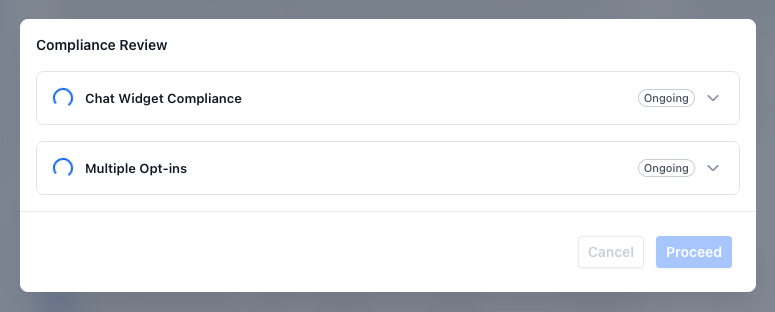
Allow the automated system to check your site, and when complete, click Proceed to submit your application.
After Approval
Once your A2P campaign is approved, you can safely re-enable:
Login links
Registration links
Add Business buttons
Follow buttons
Claim buttons
Pricing page in menu(s)
Site Reviews option in plan(s)
Your directory can then return to normal operation.
Important Notes
These SmartDirectoryAI settings are intended as a temporary compliance mode during A2P review. The goal is to simplify the customer journey for carriers reviewing your registration flow. Cleaner websites with a single compliant opt-in path generally experience better approval outcomes. Approval is ultimately determined by carriers, not SmartDirectoryAI.